

Walk into any outdoor gear store and you'll quickly feel like you need to spend $3,000 just to sleep outside for a weekend. You don't.
Most people over-invest in gear on their first trip and under-invest in knowledge. This guide cuts through the noise: exactly what to buy, what specs matter, what to skip, and how to spend wisely at any budget.
The Big Three: Shelter, Sleep, Pack
The outdoors community talks about "the Big Three" — your tent, sleep system, and pack. These are the heaviest, most expensive, and most consequential items. Get these right and everything else is detail.
1. Tents: What the Numbers Actually Mean
Capacity labeling is misleading Tent capacity labels reflect sardine-tin sizing. A "2-person" tent fits one person comfortably. Two adults want a 3-person tent. Two adults with gear: 4-person. Always size up.
Season ratings:
- 3-season: Spring through fall. Handles rain, moderate wind, mild cold. Right for 90% of camping.
- 4-season (winter): For snow loads and sustained freezing temperatures. Heavier and more expensive. Only necessary if camping in true winter conditions.
Freestanding is the right choice for beginners Freestanding tents stand on their own with poles — no stakes needed to hold shape. Non-freestanding shelters require precise stake placement and are harder to set up on hard ground. Choose freestanding.
Key specs to check:
- Polyester or nylon rain fly (polyester holds up better in UV exposure)
- Full-coverage fly that reaches close to the ground
- Vestibule(s) for muddy gear storage outside the sleeping area
- Two doors if sharing — climbing over a partner at 3am is not fun
Price guidance:
| Budget | Tent | Notes |
|---|---|---|
| $100–200 | Coleman Sundome, REI Co-op Passage | Fine for car camping in mild conditions |
| $200–400 | Big Agnes Copper Spur, Kelty Wireless | Better weather resistance, more packable |
| $400+ | MSR Hubba Hubba, NEMO Dagger | Long-lasting, backpack-able |
2. Sleeping Bags: Decoding Temperature Ratings
EN/ISO ratings are the only ones you can compare across brands These follow a standardized laboratory testing protocol. When a bag says "30°F Lower Limit," that means a warm-sleeping average man stays comfortable at 30°F. Cold sleepers (often women) should use the Comfort rating, which is typically 10–15°F warmer.
Add a safety buffer: If nights will hit 35°F, buy a 20°F bag. You can always vent; you can't add warmth that isn't there.
Down vs. Synthetic:
| Down | Synthetic | |
|---|---|---|
| Warmth-to-weight | Excellent | Heavier for same warmth |
| When wet | Collapses, loses warmth | Retains some warmth |
| Longevity | 15+ years with care | Compresses out faster |
| Price | Higher | More affordable |
| Best for | Dry climates, backpacking | Wet climates, beginners |
Pacific Northwest in spring: synthetic. High desert summer: down.
Bag shape:
- Mummy: Tapered and hooded. Most efficient. The right choice for cold camping.
- Rectangular: More comfortable for restless sleepers but loses heat at the footbox.
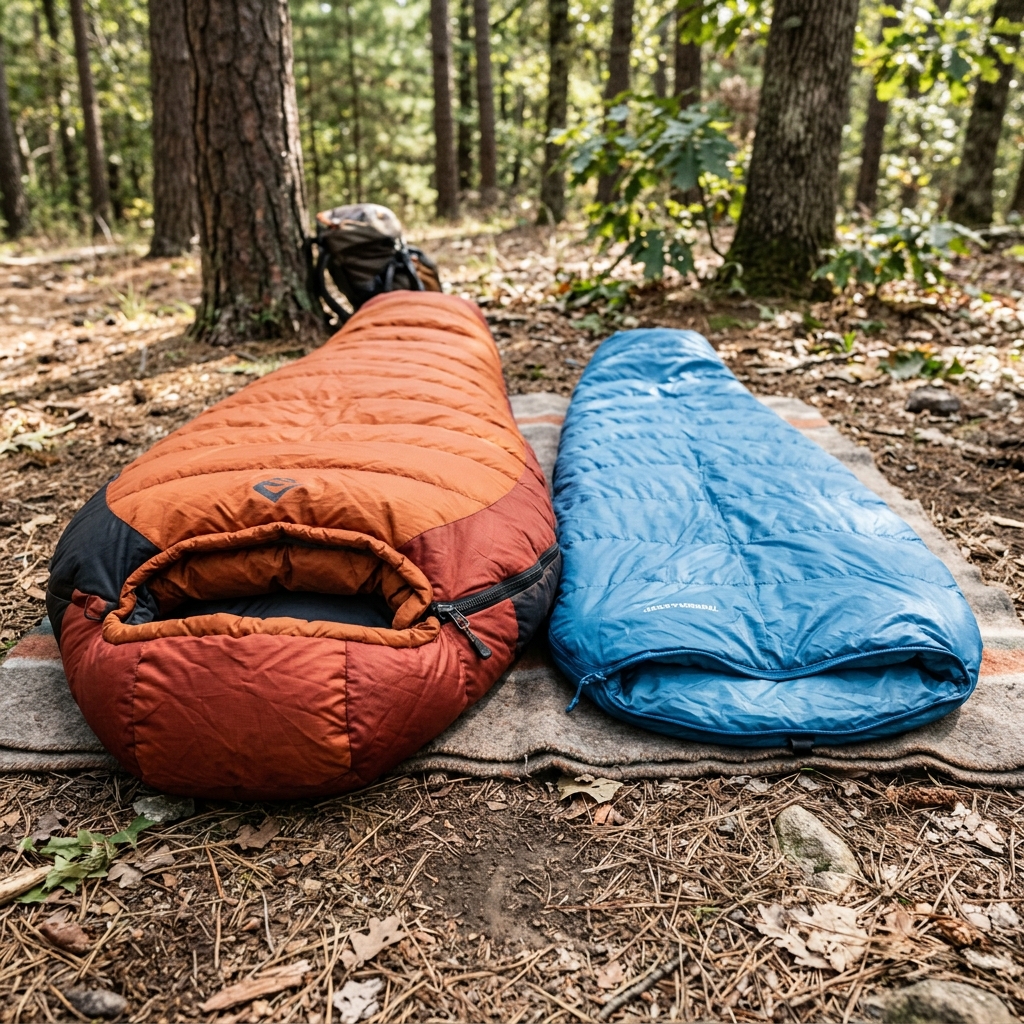 Left: lightweight 3-season bag. Right: cold-weather mummy bag. The loft difference is the warmth difference.
3. Sleeping Pads: The Most Overlooked Purchase
Most campers buy a tent and sleeping bag and forget the sleeping pad — then wonder why they were cold. The ground conducts heat away from your body far more efficiently than cold air. A sleeping pad is not a comfort luxury. It's a thermal barrier.
R-Value: The only number that matters R-value measures thermal resistance. Higher = warmer.
| R-Value | Conditions |
|---|---|
| 1–2 | Summer camping only |
| 2–4 | 3-season (spring/fall) |
| 4–6 | Cold shoulder seasons |
| 6+ | Winter and snow |
Foam vs. Inflatable:
Closed-cell foam (Therm-a-Rest Z Lite: ~$50): bombproof, no puncture risk, doubles as a sit pad, dries instantly. Bulky but essentially indestructible. Best value for beginners.
Inflatable (Therm-a-Rest NeoAir, Sea to Summit Ether): significantly more comfortable and compact. Can puncture — always carry a patch kit. Best for comfort-focused car camping.
4. Camp Stoves: Simple is Reliable
Canister stoves (recommended for beginners) Screw onto an isobutane-propane fuel canister. Simple, clean, no priming. The MSR PocketRocket 2 ($50) is the benchmark. The Jetboil Flash ($110) is an integrated boil system — the right choice if most of your cooking is boiling water for freeze-dried meals.
Performance drops in cold and at altitude. Below 20°F, canister stoves struggle. In winter conditions, switch to an inverted canister design (MSR WindPro II) or a white gas stove (MSR WhisperLite).
What you don't need for weekends: Multi-burner propane camp stoves. They work, but are heavy, expensive to fuel, and unnecessary unless cooking elaborate group meals.
5. Clothing: The Layering System
Outdoor clothing is built around three layers:
Base Layer — moisture management Material is everything here. Synthetic (polyester, polypropylene) or wool only. Never cotton. Cotton absorbs sweat, stays wet, and can cause hypothermia when temperatures drop. Merino wool is expensive but worth it — odor resistant and comfortable in a wide temperature range.
Mid Layer — insulation Fleece or a puffy jacket. A 100-weight fleece handles most camping temperature ranges. For cold conditions, a synthetic puffy (hold up when wet better than down) is ideal.
Outer Layer — weather protection A waterproof, breathable rain jacket and pants. In light drizzle, a wind-shell works. In sustained downpours and wind, you need a proper hardshell (Gore-Tex or equivalent). Don't cut corners here — getting soaked in cold weather is how safe camping trips turn dangerous fast.
6. Water: Filtration and Capacity
At developed campgrounds with potable water, you can skip the filter. For dispersed camping or backpacking:
The Sawyer Squeeze (~$35) is the standard filter for beginner to intermediate camping. Rated to 0.1 microns — removes bacteria and protozoa including Giardia and Cryptosporidium. Does not remove viruses — a relevant limitation outside North America.
For viral coverage: add a Steripen UV purifier or Aquatabs chemical treatment.
Carry at least 2 liters per person. In heat or during active hiking, 3–4 liters.
7. What to Skip on Your First Trip
- Solar chargers: Useful on long trips. Unnecessary for weekends if you charge before you leave.
- Camp chairs: Nice, not essential.
- GPS device: A downloaded offline map on your phone (Gaia GPS, Avenza) handles 95% of situations.
- Camp lanterns: A headlamp is lighter, more versatile, and hands-free.
- Bear canisters: Required in specific areas — check your destination's regulations. Not universally necessary.
Gear Budget Guide
Budget ($200–350 all-in)
- Coleman Sundome 3-person tent
- Kelty Cosmic 20°F sleeping bag
- Therm-a-Rest Z Lite foam pad
- MSR PocketRocket 2 stove
- Sawyer Squeeze filter
Mid-Range ($400–700)
- REI Co-op Passage 2 tent
- REI Magma 15°F sleeping bag
- Therm-a-Rest NeoAir XLite pad
- Jetboil Flash stove
- Sawyer Squeeze filter
Performance ($700–1,200)
- Big Agnes Copper Spur HV UL2 tent
- Western Mountaineering sleeping bag
- Therm-a-Rest NeoAir XTherm pad
- MSR WindBurner stove
- Katadyn BeFree filter
Buy, Borrow, or Rent?
Borrow first. Most people in the camping community have extra gear in their garages.
Rent for big items. REI and many outdoor shops rent tents, sleeping bags, and pads. Great for a first trip before committing to a purchase.
Buy used. GearTrade, eBay, and Facebook Marketplace carry high-quality used gear at 30–60% off. Sleeping bags: verify the loft hasn't been compressed out. Tents: check the seams and fly for delamination.
The best camping gear is the gear you have that gets you outside. Upgrade over time as you learn what you actually use and wish you'd had. The only expensive mistake in gear is buying performance equipment for conditions you'll never camp in.